Skins
03/06/21 08:22
Origin Story
I love the patterns paint makes when it rolls off a painting onto the tray below. Sometimes I scrape the paint up carefully with a palette knife and lay it onto a painting, but it’s hard to transfer more than a tiny amount of paint onto a canvas, so that kind of beauty is usually lost in the process. It’s a gift from chaos to the artist but it’s a hard one to share with anyone else.I noticed that in a package of canvases a few of them will come shrink-wrapped. Perhaps every other one, probably because it means the rest don’t need to be wrapped as they are already surrounded by their neighbor’s plastic wrapping.
So I took one of the shrink-wrapped canvases and used it as a tray and painted a smaller canvas. Then I found that the dripped paint could be peeled off after it had dried. I found that it would stick to a glass door with no adhesive - just air pressure. That was about a year ago and I kinda forgot about it except that the two big drips I preserved have been stuck on my kitchen sliding door since then. They’ve never fallen off.
Recently I was wondering what I would do if someone wanted me to paint a wall of their home using pour painting techniques. How would I make a pour painting not on a canvas, but on a wall? To be clear, nobody has asked me to put art on their wall: it was just an interesting problem to solve in my head. I gave up on any approach involving putting wet paint on the wall because gravity is a merciless opponent. Then I remembered dripping paint on the shrink-wrapped canvases. I realized that I could probably arrange a flat space as big as the person’s wall, and cover it tightly in plastic sheeting, and then pour-paint onto the sheeting. Then after it dried I’d roll it up, sheeting and all and transport it to the person’s house. I’d unroll it from the ceiling down and separate it at the same time from it’s backing, while attaching it to the wall with a thick, but very slow adhesive. I’d work out bubbles and wrinkles as I went, but if done correctly these would be few.
That gave me the idea that I should just try producing painting-sized skins not on a canvas so they can be transferred to other surfaces. They can be mounted on glass and framed, or they can be shipped as a skin and someone can apply them to their own glass door or window for art that is beautiful and related yet different from both sides. Every painting presents a transformation and there is a definite “from” and “to” side.
Making Skins
So I did some pour painting on some shrink-wrapped canvases and let the paint dry. I made several paintings of different types.Skins are more versatile than paintings, and twice as interesting.
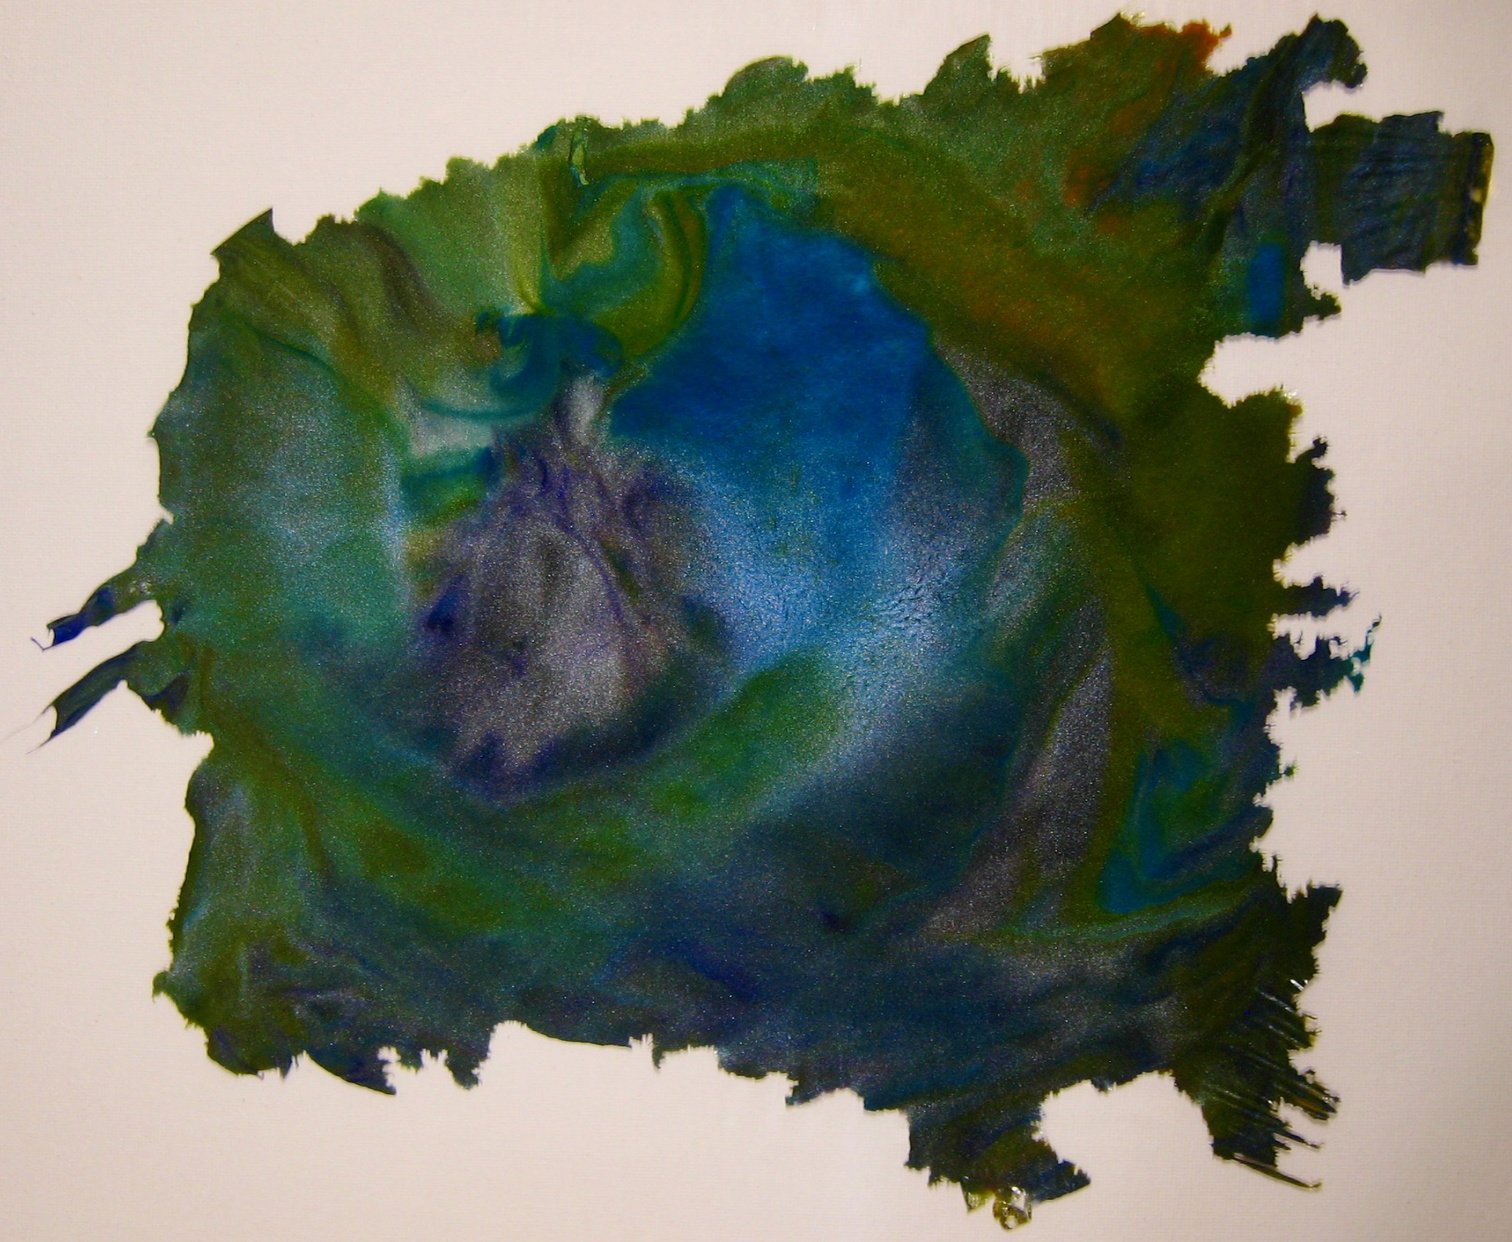
One thing I imagined to be true is that the first color to hit the plastic at any point pretty much determines what the backside of the paint skin will look like. What you do with the paint will determine what the top side will look like. So, one of my paintings was a filled zone with black and graphite lines and various greens, yellows and blues in the zones. The back side is likely to look a lot like it did when I first put the paint down. The top evolved a lot. I didn’t do a swipe on this one because I really wanted to compare the bottom side with the highly evolved top. The difference is a transformation recorded in about 1/16” of paint.
In addition, I also made a swipe, a flip cup and a dirty pour.
I painted on 16x20 shrink-wrapped canvases.
The first thing I realized is that my goal was not to reach the edges and create a rectangular shape. My goal was in fact not to quite reach the edges so that the shape the painting took was completely natural. I didn’t always succeed. I can always cut a curve into a flat edge if I need to hide it.
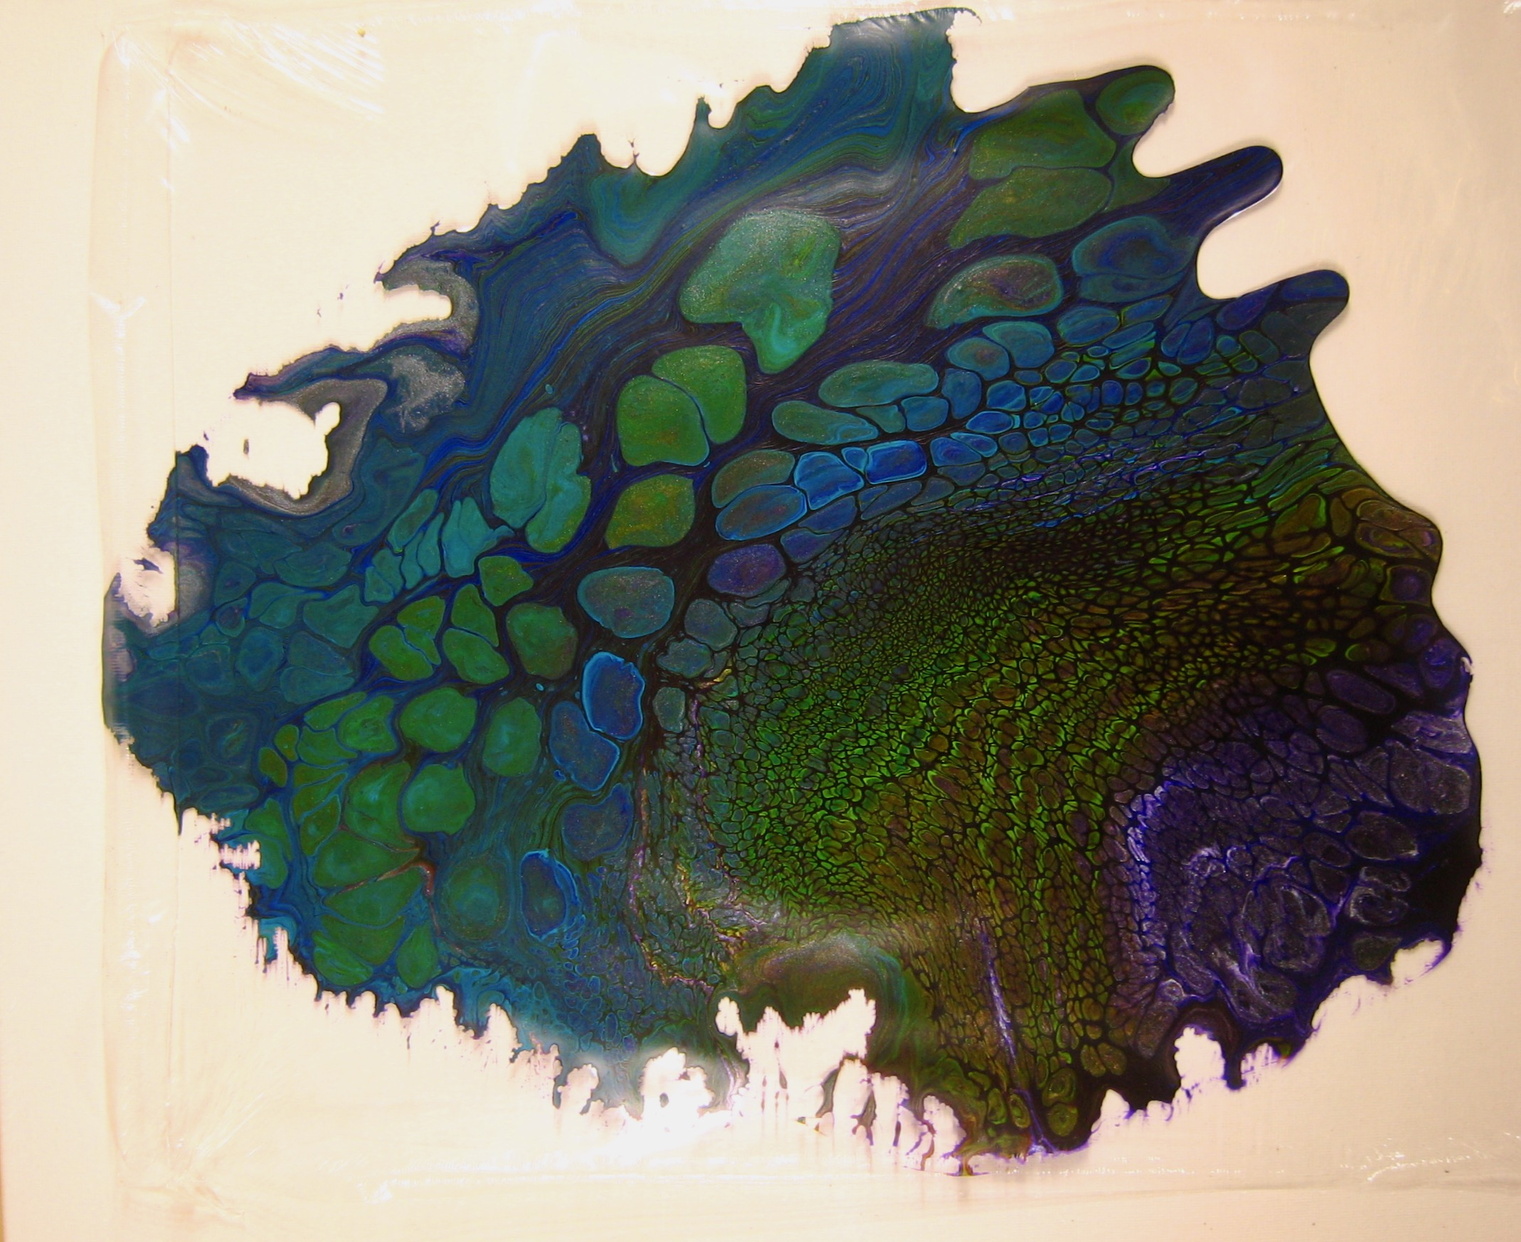
This is the bottom of the skin, which would normally be adhered to a canvas:
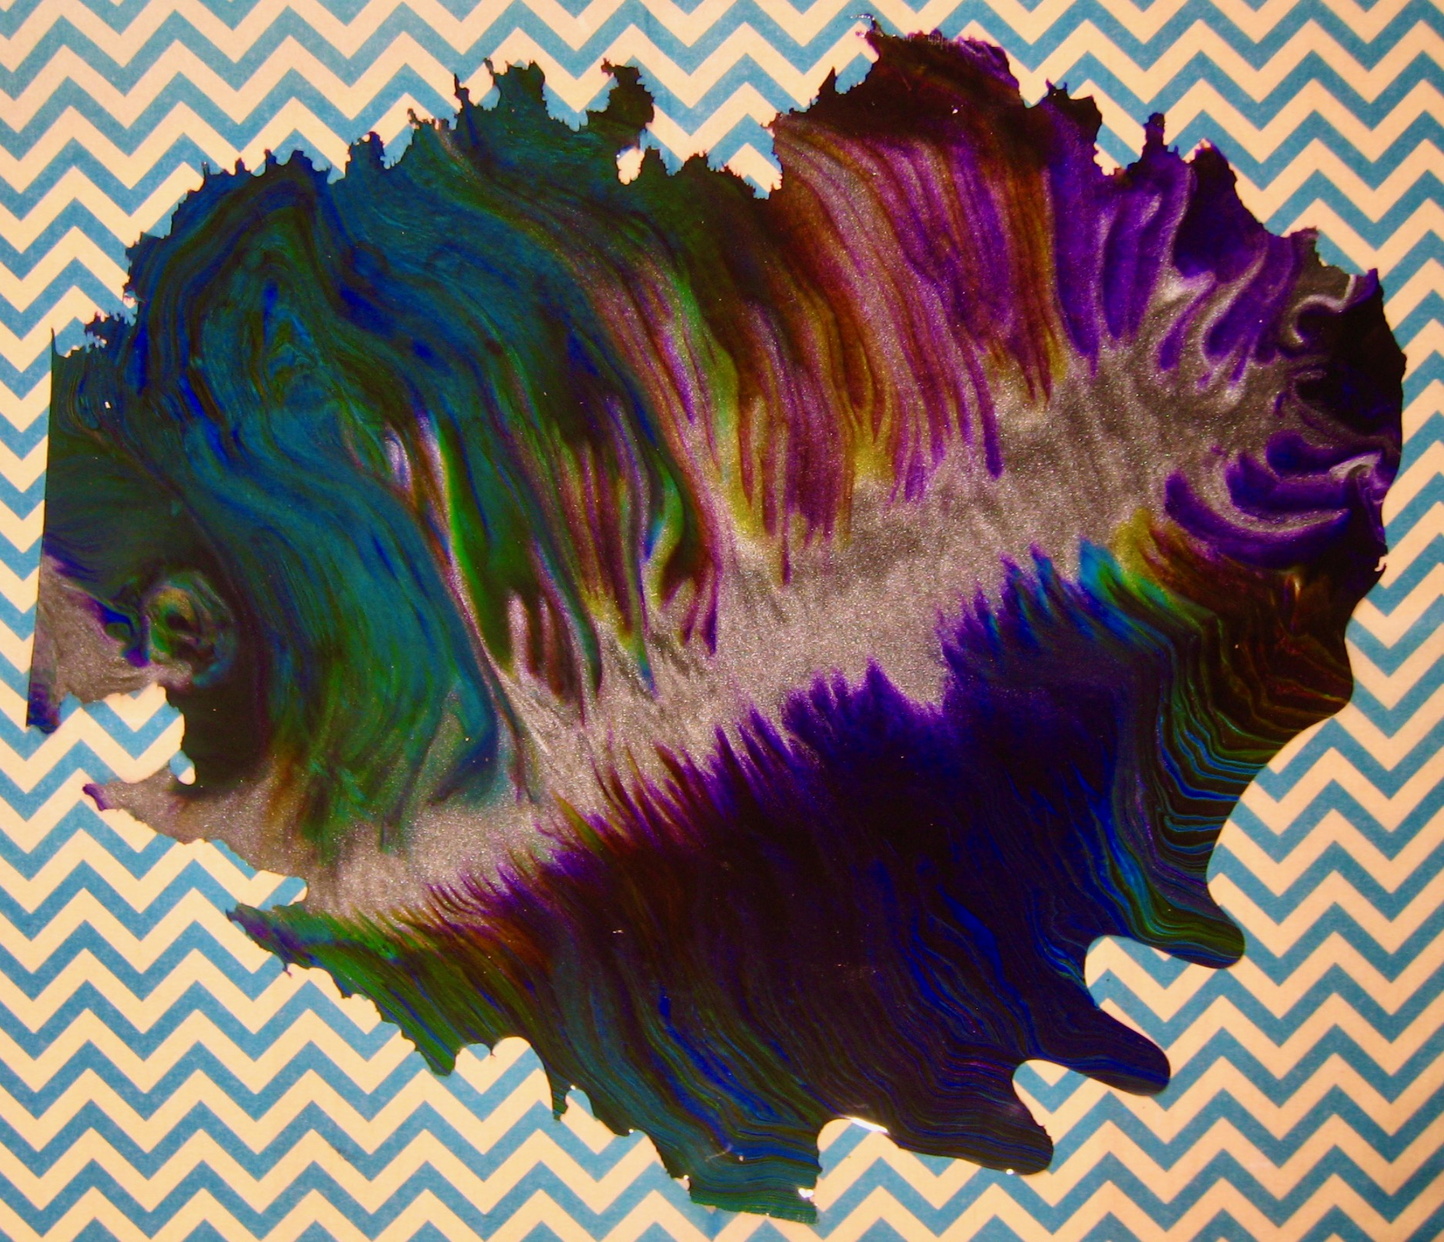
This is the top of the same skin, if this was on a canvas this would be the only side you could see:
Most aspects of pour painting transfer well to making skins. I didn’t attempt to coat the entire work area with a color before pouring onto it. If I did that I think the back might just look like that base color since that is the first thing to touch it. I knew that techniques like panning a painting by tilting it would help spread the paint around the work area, but it wouldn’t affect what was seen on the back where the paint already was after the initial pour.
It is important not to make the paint too thin by panning too much. If there isn’t enough paint on the plastic sheeting the resulting skin can be difficult to remove and use. It’ll be more fragile. But, it might be more translucent, especially if you have used transparent or semi-transparent paints. One of my paintings wasn’t dry after 72 hours. That was a large filled zone painting. There was enough paint on it that the weight of the paint deformed the plastic slightly, leading to a much thicker middle of the skin than the edges. But, at least the paint didn’t roll off the edges.
You cannot use a torch to pop bubbles anywhere near the thin shrink-wrap plastic. It will immediately melt, which means paint may roll off its surface onto the canvas, gluing them together. It’s a mess and is easy to avoid. I pop bubbles with my finger or a dry toothpick or the point of a piece of paper.
Removing a Skin
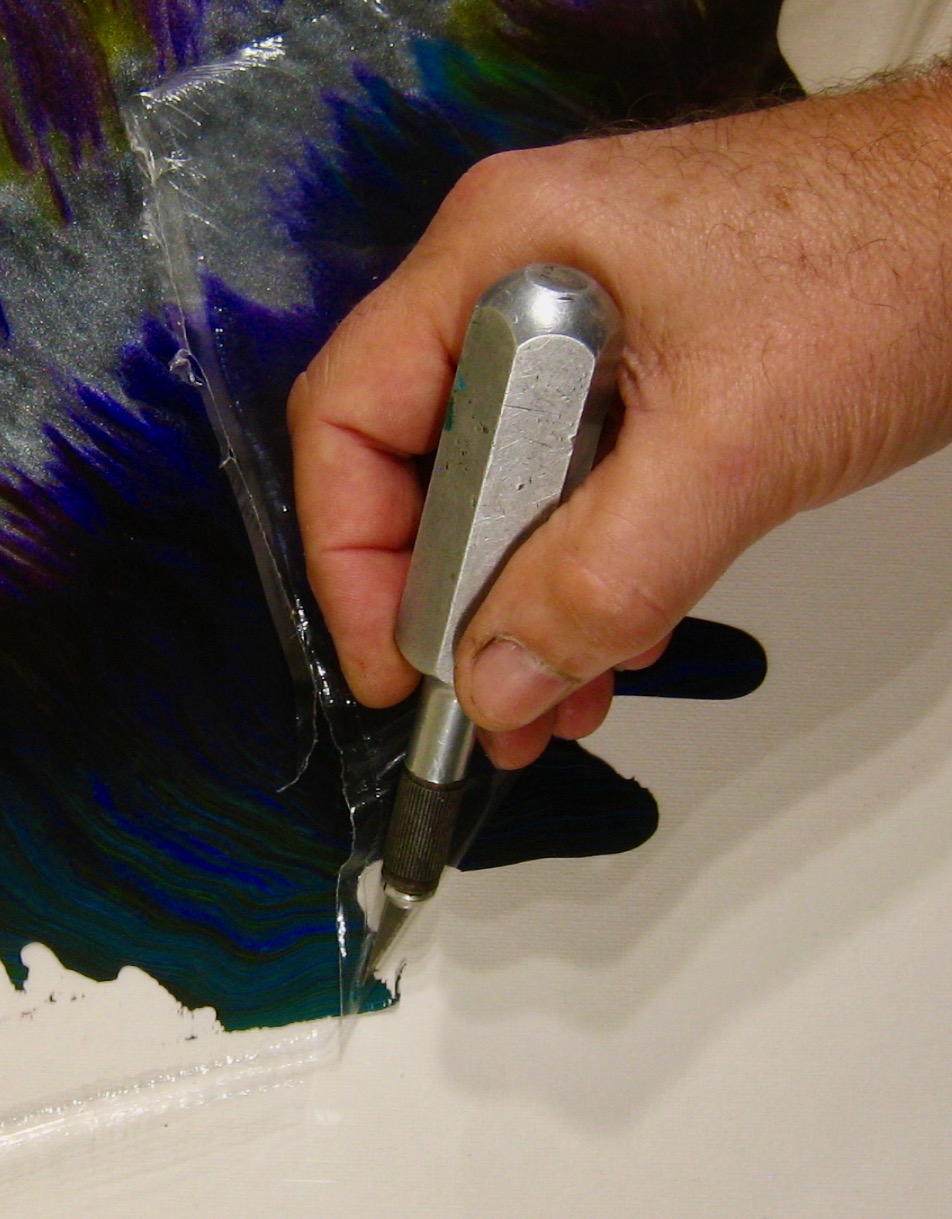
I waited for 72 hours before attempting to remove the first skin from its shrink-wrap backing. It was completely done drying by then, but it wasn’t ready at 48 hours. One of them required five days to dry because the pain was very thick in the middle.I started by cutting the plastic wrapping around the outside edge of the canvas with a new blade on a hobby knife. It took almost no pressure to cut through the plastic and it never cut into the canvas. Then I carefully split the seam cut by the knife and removed the skin still on its plastic sheet.
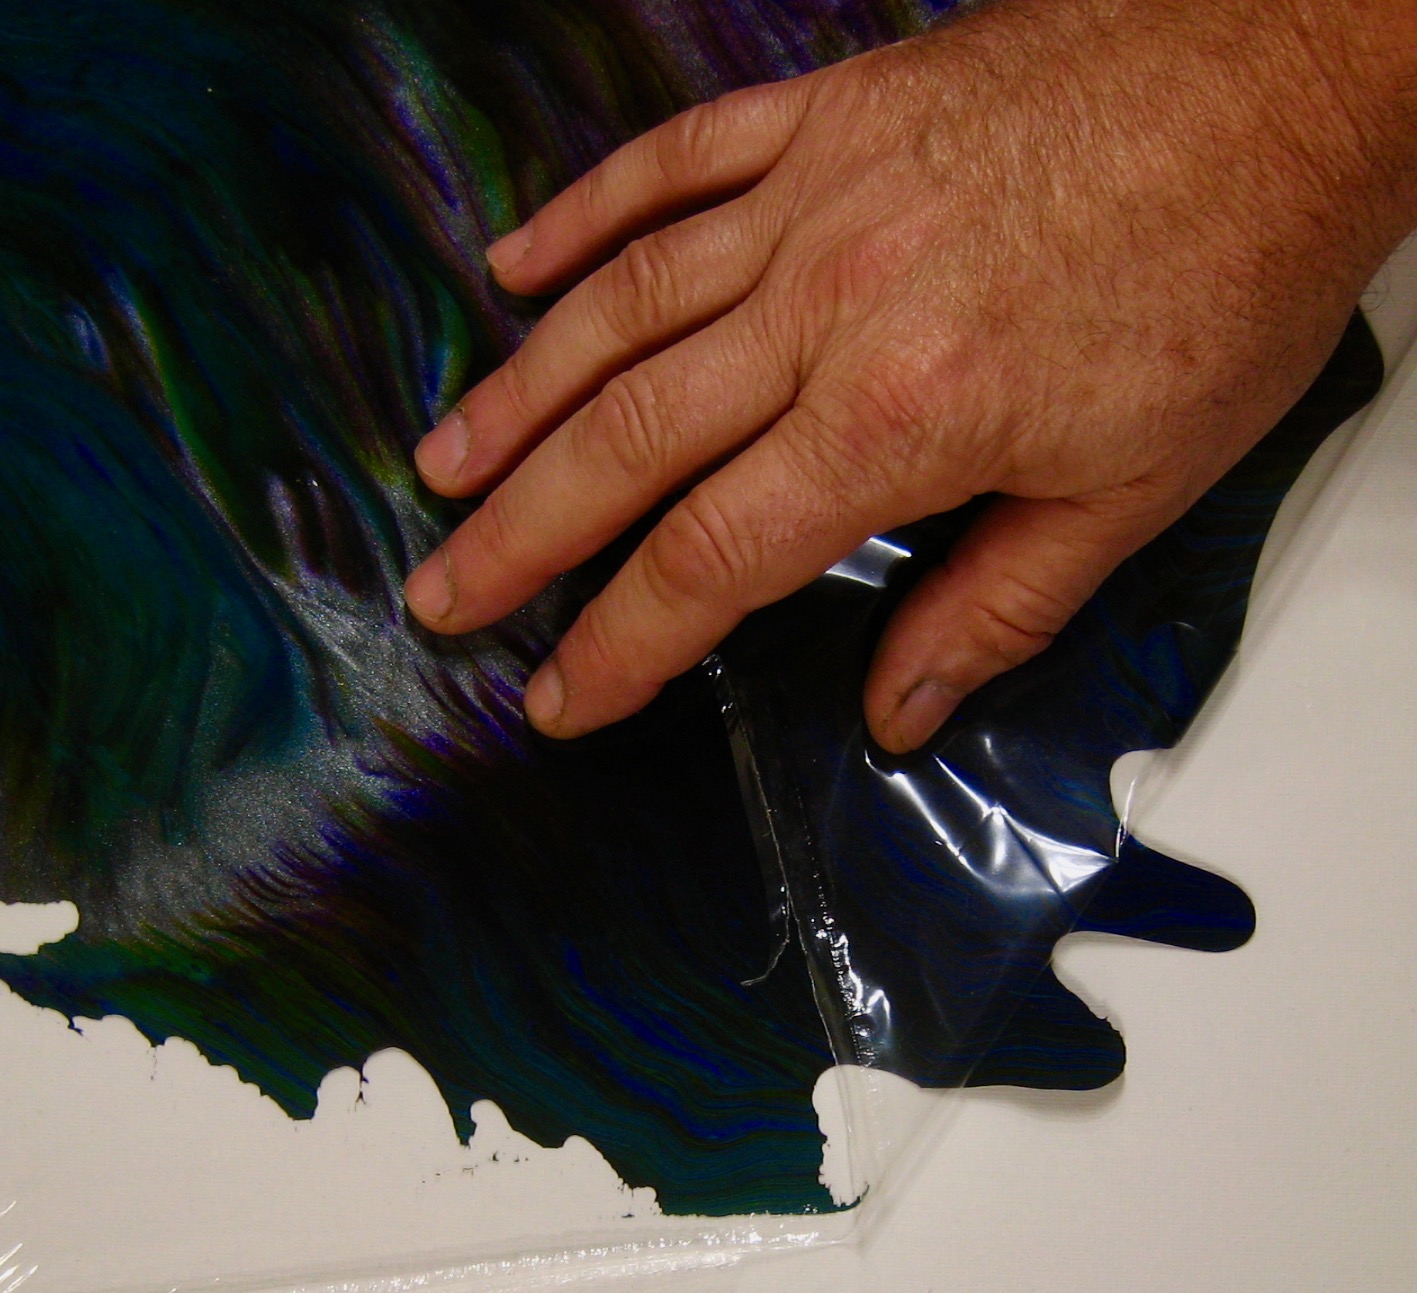
I put the skin down on a clean table and pulled the plastic back over the skin, keeping the rolling edge right at the level of the table. This pulls the plastic off without damaging the skin.
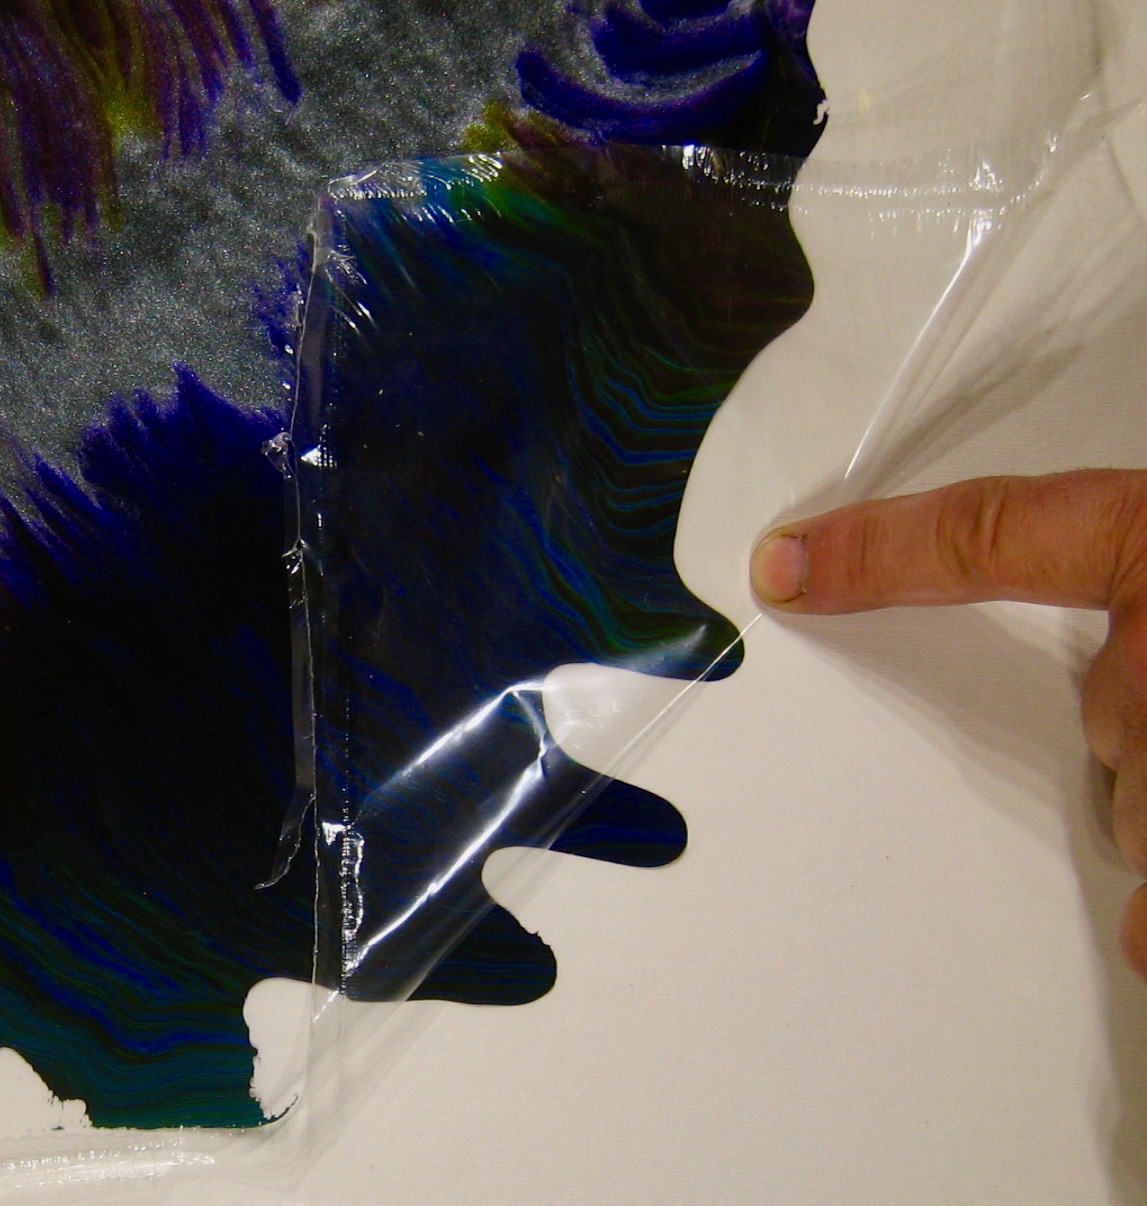
There were several points where I needed to use the hobby knife to gently separate the leading edge of a point of the painting to separate from the plastic, but once I separated them the plastic pulled off the skin quite easily.
Wherever the painting had a contour that crossed the peeling edge I needed to get the orphaned edge separated from the plastic before I could continue the peeling process.
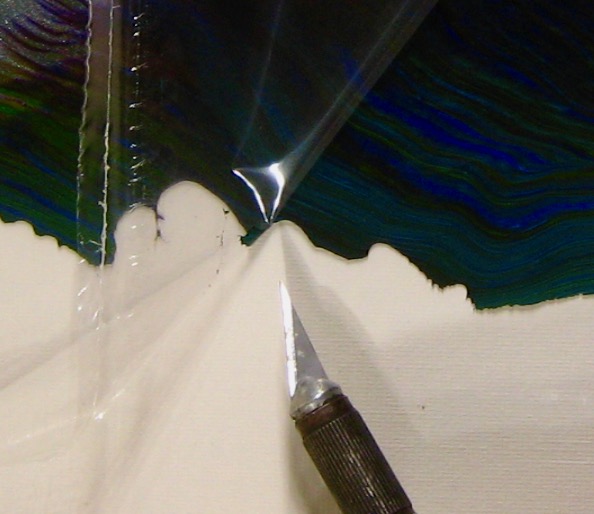

Even the finest details where the paint beaded up into fingerlings and deltas along the edge of the skin were preserved. It’s really extraordinary how many of the physical details of way the painting laid on the plastic were preserved.
Storage
Skins are fragile and are made of dried glue and acrylic paint. They have to be kept away from persistent moisture, but they can certainly be cleaned with a damp cloth and mild soap and water.I hold them by folding them inside a “book” I make using two sheets of cardboard that are the same size as each other, both being bigger than the skin. I hinge these two sheets of cardboard and fold a sheet of tissue paper inside the cardboard so it covers both sheets. I put the skin between the layers of tissue paper and close the book. I write Top and Bottom on the outside of the cardboard and I add my inventory number to the cardboard as well to minimize how often I need to open the book to look at it since its photo will be online.
Then I store the book flat where it won’t be bent or affected. Don’t put a lot of weight on the book or store it where it will get hot. I think if it is stored at a reasonable temperature and low humidity it will last a long time stored this way but I don’t have direct experience in long term storage yet.
Applications
Skins are really flexible and somewhat stretchy. They’re surprisingly strong but I wouldn’t push that. No doubt they will tear. They are easy to cut and to apply to a curved surface, even to a radius of a pencil. You can glue them on with white glue or rubber cement. It will adhere to glass and other highly smooth and clean surfaces without any kind of glue. Skins aren’t so durable as to be a good hand-grip though, but they can be coated with an acrylic sealer or even embedded in resin for a more durable results.Skins are pretty soft, so you can glue them on and then shave off the excess. Don’t worry about cutting them exactly to the shape of an object. Trimming off the excess after the glue dries yields a very clean edge that exactly follows whatever it was glued to. Clamping can be a challenge for some shapes. Rubber bands and weights work well for clamping, but remember that the glue can get on your clamps too.
It is easy to cut out shapes from of a skin and glue them onto cards, put them in photo albums as edges, borders, corners, separators or other embellishments. They feel like fruit-leather. Don’t install them where anyone would be tempted to taste them as they are still toxic if consumed. They are pretty inert once dried, unless swallowed.
You can also cut them along natural lines in the patterns on either the front or back, but they’ll rarely align so cuts like that will look better on one side than the other.
You can cut a large hole in the middle of a skin to form a framed area for a mirror. You can see yourself inside this frame. Use a compass to scribe a circle and carefully cut it using a hobby knife with a new blade on a tissue-on-cardboard covered surface. Careful not to cut all the way through the cardboard.
You can put it on a blank area of an appliance like a refrigerator or washer, or attach it to a cabinet door. A thin layer of rubber cement should allow it to remain on vertical wooden surfaces or any surfaces that aren’t smooth. A bathroom might be too wet, but corners on mirrors are easy to cut.
You can also cut these skins with scissors that have edge patterns. These come in a wide variety and are popular for scrapbooking.
To make four identical corners (e.g. for a mirror), fold a square piece of paper in half to form two triangles and cut them apart. Take one of the triangles and fold it in half and cut any pattern you like into the two separate (shorter) edges (not the two separate, longer hypotenuse). When you unfold the triangle the two sides of the pattern will be symmetrical. You can use this as a template to cut a skin to form four identical corner shapes which can be either glued to a mirror or simply applied to a clean mirror where it should just stick on its own.